3D Models and Sites
If Sandbox is installed and running on a stand-alone PC or as part of a simulation center, then the models that have been uploaded and processed by the 3D Model importer must be downloaded and placed in the local file system. To download a processed model, you must first log on to your cloud account.
Downloading a 3D Model
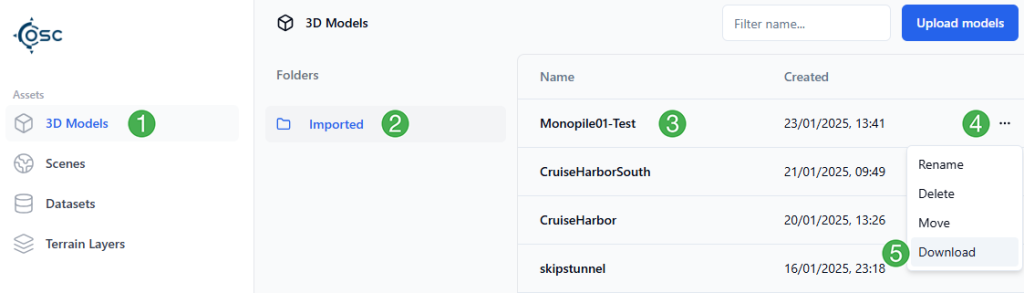
Under Assets, click
3D Models.Select the folder in which the model is located.
Find the model in the list. You can also type in parts of the file model name in the search box at the top right to filter the model list.
Click
...to open the context menu.Select
Downloadfrom the context menu options.
Placing Downloaded 3D Models
3D models are downloaded as a compressed zip archive and should be unzipped before continuing. An expanded archive of a collision model will contain:
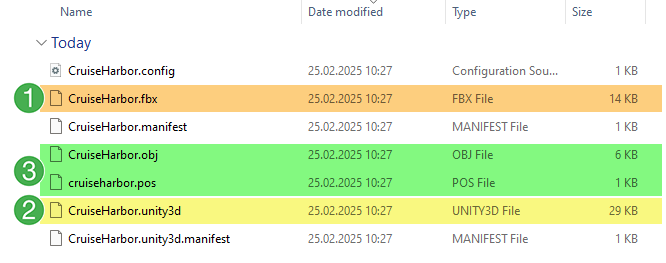
The original file (FBX) that was uploaded.
Visual file, the processed UNITY3D file of the original FBX model.
Collision file (OBJ, original) and position file (POS)
Only the UNITY3D, OBJ and POS files from the archive need to be placed in your local file system. The folder structure varies depending on your installation type and whether you have a file server or not. The main folder is “My3DModels”. Typical locations:
C:\osc\My3DModels\ # standalone installations
O:\My3DModels\ # bigger sites
Place the UNITY3D, OBJ and POS files in their respective folders:
3D (UNITY3D files)
Collision-Models (OBJ and POS files)
Depending on your installation, these folders may be inside Java runtime versions of Sandbox (e.g., standalone_java17, standalone_playground):
C:\osc\My3DModels\standalone_java17\3D\ # Place the UNITY3d file in this folder
C:\osc\My3DModels\standalone_java17\Collision-Models\ # Place the OBJ and POS files in this folder
Example 1
This setup is typical for older versions of a Sandbox bundle installation:
C:\osc\My3DModels\3D\ # Place the UNITY3d file in this folder
C:\osc\My3DModels\Collision-Models\ # Place the OBJ and POS files in this folder
Example 2
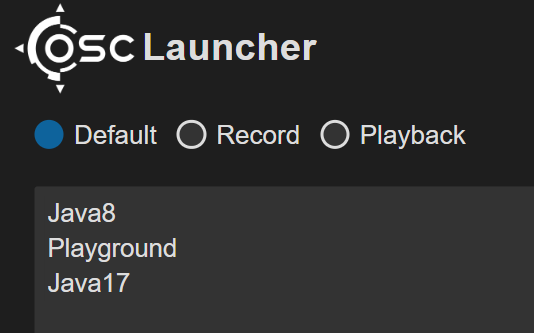
This setup is typical for newer versions of a Sandbox bundle installation. Please note that the Java version corresponds with the Launcher. For example, in this installation there are 3 items in the launcher:
The folders inside My3DModels are:
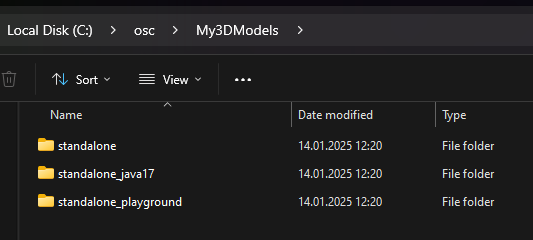
Thus, each of these folders will then have sub-folders called 3D and Collision-Models: where you can place the respective files depending on your need:
C:\osc\My3DModels\standalone\3D\ # Place the UNITY3d file in this folder
C:\osc\My3DModels\standalone\Collision-Models\ # Place the OBJ and POS files in this folder
C:\osc\My3DModels\standalone_java17\3D\ # Place the UNITY3d file in this folder
C:\osc\My3DModels\standalone_java17\Collision-Models\ # Place the OBJ and POS files in this folder
C:\osc\My3DModels\standalone_playground\3D\ # Place the UNITY3d file in this folder
C:\osc\My3DModels\standalone_playground\Collision-Models\ # Place the OBJ and POS files in this folder
Organizing the files
Create folders to stay organized. The folder names for visual and collision models don’t need to match as Sandbox will find and match these files as long as they are within the folders described above.