Recordings
Screen recording in Sandbox allows users to capture their session activity instantly by pressing F9, with an intuitive countdown and easy controls for starting and stopping. Once saved, recordings are automatically organized and accessible in the web portal’s Recordings section, where users can view, share, rename, or delete files. Sharing is flexible—recordings can be distributed internally or externally, with optional password protection for added security. All recordings are centrally managed, searchable, and downloadable for further processing, making collaboration and documentation seamless across multiple workspaces.
Starting and Stopping a Recording
To start a screen recording, simply press the F9 key on your keyboard. A countdown from 3 will appear, giving you time to prepare before the recording begins. During the recording, you can press F9 again to stop it.

After pressing F9 to stop, a prompt will appear to enter a file name for the recording. Pressing ESC cancels and erases the recording. Press Enter to save the recording. Recordings will be available in the Recordings library when processing is complete. Newer recordings will show at the top of the list.
Note
Recordings will show as
 until they are
 . Videos that are still being processed cannot be viewed until processing is complete.
Accessing Recordings Library
From the left-side Assets menu, left-click
Recordings. Please review the Asset Library Overview for information about viewing and managing assets in the Assets library.
Note
If a scene is currently running, exit Sandbox by pressing the
 icon located at the lower right corner.
Viewing Recordings
To view a recording, simply left-click
on a recording’s name in the list. The recording will then open in a video viewer inside the Asset Library. Left-click
anywhere on the video to start and stop the video. Full screen option is available.
Sharing a Recording
Press the
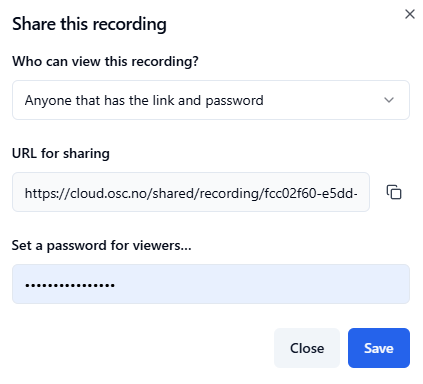
 button to share your recording directly within the Asset Library. By default, all recordings are shared with your team. To share a recording to someone outside your team, select
 Anyone that has the link and password from the drop-down menu.
Set a password and copy the link to share the recording with someone outside your team: