Map Overlays
Map overlays are a powerful feature in digital twin simulations, allowing users to superimpose additional layers of information onto a base map or 3D environment. These overlays can include data such as traffic patterns, weather conditions, infrastructure layouts, sensor readings, or asset locations. By visualizing multiple datasets simultaneously, users gain a comprehensive understanding of complex systems and their interactions within a simulated environment.
Important Notes
Geographic Size Limit
The GML file should not cover a geographically large area— ideally, not more than a few square kilometers. The parser transforms vector data into raster, which has a limited size. Large polygons must be split into several smaller files.
Field Renaming Requirement
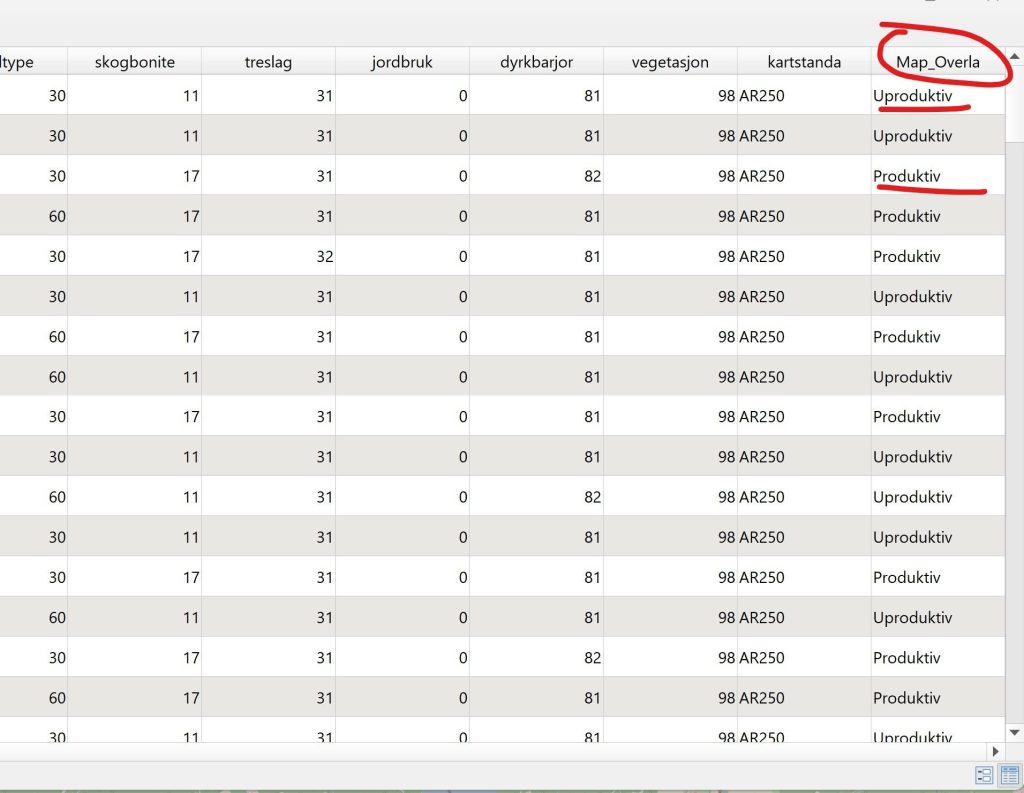
For layer support, the field to be visualized must be renamed to Map_Overlay for proper parsing and display. If your GIS software limits attribute names to 10 characters, use “Map_Overla” when exporting to GML, then edit the file to replace all instances with Map_Overlay.
Supported Geometry
Only GML files containing Polygon data are supported. Points and Lines are not supported. Each visualization area should be separated into individual GML files or layers named Map_Overlay.
For example:
Aalesund_Sediments_Rock.gml and Aalesund_Sediments_Sand.gml
or:
<ogr:Map_Overlay>Antropogent materiale</ogr:Map_Overlay>
Vector data can be converted to .GML using QGIS which is a free software.
Requirements
General Requirements
Namespace Definition: The GML file must define all necessary XML namespaces, such as gml, ogr, and app.
Coordinate System: The GML file must include an srsName attribute within geometry elements to specify the coordinate reference system (e.g., EPSG:xxxx).
Minimum Elements: Each polygon must have at least three coordinate pairs.
OGR Namespace Requirements
Root Element: The root element must enclose geometry within an ogr:geometryProperty element.
Polygon Structure: Use <gml:Polygon> for a single polygon or <gml:MultiPolygon> for multiple polygons.
Boundary Elements: Use <gml:outerBoundaryIs> for the outer boundary and <gml:innerBoundaryIs> for holes. Coordinates go in <gml:coordinates>.
Attributes: Each polygon must include a fid attribute for unique identification. Example:
 1<ogr:geometryProperty>
 2  <gml:Polygon>
 3    <gml:polygonMember>
 4      <gml:Polygon>
 5        <gml:outerBoundaryIs>
 6          <gml:LinearRing>
 7            <gml:coordinates>10.0,20.0 15.0,25.0 20.0,20.0</gml:coordinates>
 8          </gml:LinearRing>
 9        </gml:outerBoundaryIs>
10        <gml:innerBoundaryIs>
11          <gml:LinearRing>
12            <gml:coordinates>12.0,22.0 14.0,24.0 18.0,22.0</gml:coordinates>
13          </gml:LinearRing>
14        </gml:innerBoundaryIs>
15      </gml:Polygon>
16    </gml:polygonMember>
17  </gml:Polygon>
18</ogr:geometryProperty>
GeoNorge Namespace Requirements
Root Element: For GeoNorge-specific GML files, use <app:område> as the root element.
Polygon Structure: Define surfaces within <gml:Surface>.
Boundary Elements: Use <gml:PolygonPatch> and <gml:LinearRing> for boundaries and coordinates.
Attributes: Each surface or polygon must include a gml:id attribute.
Additional Guidelines for Map_Overlay
Each <gml:featureMember> must contain one feature (polygon).
Each feature must have a unique fid attribute. Example:
1<gml:featureMember>
2    <ogr:Cairo_bareSoil_UTM36N fid="Cairo_bareSoil_UTM36N.0">
How to Create a Map Overlay Using QGIS
Open QGIS
Open the vector file containing polygon(s) or draw your own polygons.
NOTE: Line and point data can be converted to Polygons using the “Buffer” tool in QGIS. Closed lines can be converted to polygons using “Lines to Polygon”
Make sure the layer is in a UTM projection:
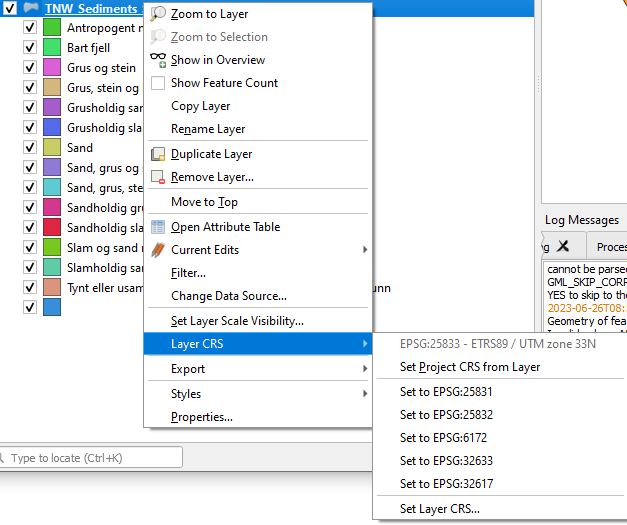
To visualize individual layers right click the layer and select
Properties: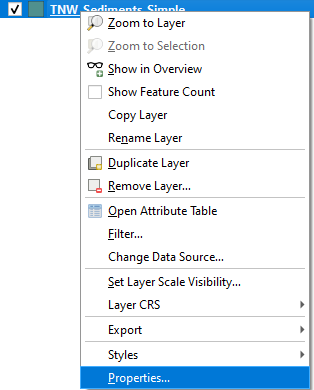
Select
Symbologyand choseCategorized(or Graduated depending on the data) from the top drop-down. Then select theValueyou want to categorize. Finally clickClassifyto get the list of layers: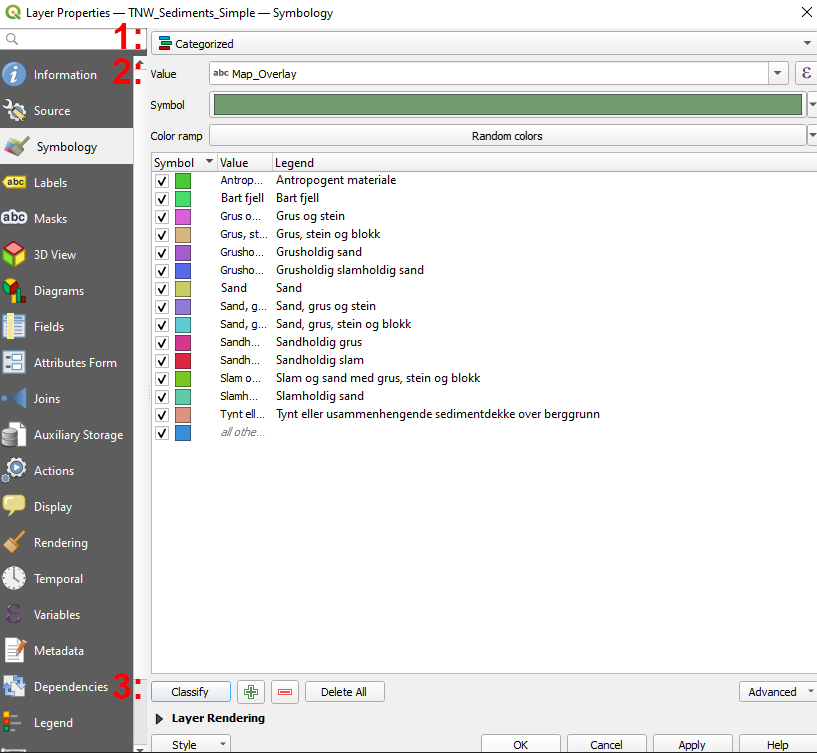
In
Fieldsclick “toggle editing mode” and rename select the value of interest toMap_Overlayand clickApplyand thenOK.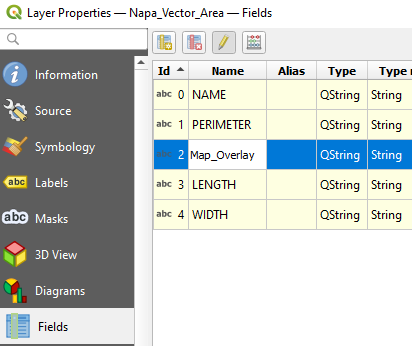
Warning
if your original file is a shapefile, the maximum number of character for a column name is 10. Therefore, the name
Map_Overlay, required for sandbox to parse, is not a possible name as it contains 11 characters. Therefore, to achieve the result, you can save with a different name, like “Map_Overlay_2”, and then export as .gml 2.0, and after open an editing software to replace “Map_Overlay_2” with “Map_Overlay”. This is required otherwise it won’t be found by sandbox’s parser.Right click the Layer you want to export and hover
Export→Save feature as: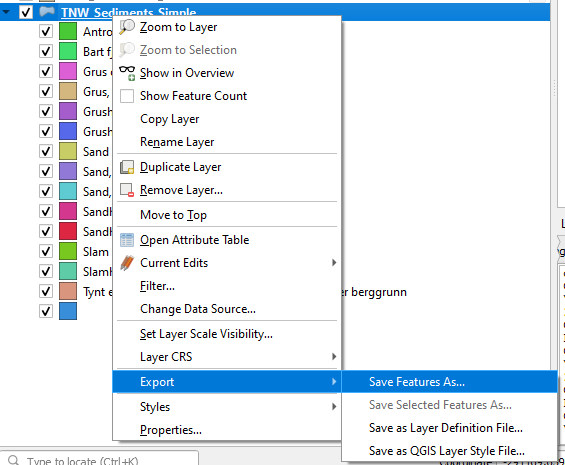
Format: Geography Markup Language [GML].
Important: use version GML 2.0. Version 3.0 and 3.2 are known to be not working with sandbox.
Upload the file using the Datasets and chose
Map Overlayas your category.Start Sandbox and load the Map Overlay file from the Data View menu.
Layers as a Single Category
To have multiple layers under one category, use different values for Map_Overlay before exporting. The .gml file name defines the category name. Layer names must not contain spaces.
Limitations
Points and lines are not supported.
UTM projection system required.
Layers must be enabled one by one from Data View.
Known Issues
Large datasets may cause crashes.
Colors may not change as expected.
Video Tutorial
The video below shows how to add a map overlay in Sandbox using QGIS.
Example Code
Legacy (RC5 version):
<?xml version="1.0" encoding="utf-8" ?>
<ogr:FeatureCollection
     xmlns:xsi="http://www.w3.org/2001/XMLSchema-instance"
     xsi:schemaLocation="http://ogr.maptools.org/ Cairo_Rivers_UTM36N.xsd"
     xmlns:ogr="http://ogr.maptools.org/"
     xmlns:gml="http://www.opengis.net/gml">
  <gml:boundedBy>
    <gml:Box>
      <gml:coord><gml:X>288586.4263130572</gml:X><gml:Y>3297003.185291412</gml:Y></gml:coord>
      ...
    </gml:Box>
  </gml:boundedBy>
  <gml:featureMember>
    <ogr:Cairo_Rivers_UTM36N fid="Cairo_Rivers.0">
      ...
    </ogr:Cairo_Rivers_UTM36N>
  </gml:featureMember>
</ogr:FeatureCollection>
Current Release (Multi-polygon):
<?xml version="1.0" encoding="utf-8" ?>
<ogr:FeatureCollection
     xmlns:xsi="http://www.w3.org/2001/XMLSchema-instance"
     xsi:schemaLocation="http://ogr.maptools.org/ TNW_Sediments_Simple.xsd"
     xmlns:ogr="http://ogr.maptools.org/"
     xmlns:gml="http://www.opengis.net/gml">
  <gml:boundedBy>
    <gml:Box>
      <gml:coord><gml:X>43460.05129734433</gml:X><gml:Y>6969461.168263866</gml:Y></gml:coord>
      ...
    </gml:Box>
  </gml:boundedBy>
  <gml:featureMember>
    <ogr:TNW_Sediments_Simple fid="TNW_Sediments_Simple.0">
      ...
      <ogr:Map_Overlay>Grus, stein og blokk</ogr:Map_Overlay>
    </ogr:TNW_Sediments_Simple>
  </gml:featureMember>
  <gml:featureMember>
    <ogr:TNW_Sediments_Simple fid="TNW_Sediments_Simple.1">
      ...
      <ogr:Map_Overlay>Antropogent materiale</ogr:Map_Overlay>
    </ogr:TNW_Sediments_Simple>
  </gml:featureMember>
</ogr:FeatureCollection>
Additional Links
QGIS: https://qgis.org